
I’ve been talking for years about wanting to make bagels. I spent a few years working near the financial district in Manhattan. Most mornings, I would stop by Leo’s Bagels and grab a bagel with cream cheese and a coffee. The coffee was so-so, but the bagel was amazing. The flavor, the texture, the chewiness, there’s not really another bread like it.
Now, I wouldn’t necessarily call myself a bread expert, but I do a pretty fair job with yeast doughs, especially rolls. For some reason, I have always thought Bagels as an extremely difficult thing to make. Well, that’s not really the case. Honestly, Bagels are just like any other roll, but with an extra step.
I looked at several recipes for Bagels, mostly for technique and approach. I settled on a relatively simple recipe, that was consistent with my bread experience.
I use a dry active yeast in my breads, mostly Fleischmann’s. Start by activating the yeast, this is done by mixing a teaspoon of sugar, 2 ½ teaspoons of yeast, and ¼ cup of warm water (ideally between 100 and 110 degrees Fahrenheit), or use the instructions specific to your yeast of choice. Stir until the yeast granules are dissolved. It’s ok if not all the yeast dissolves. Wait until the yeast get’s foamy, about 5 – 10 minutes. If you don’t see bubbles almost immediately after mixing, then you may have a problem. If after 10 minutes, it doesn’t look like the foamy head on a fresh poured Guinness, then you may have a problem. Yeast can be a bit temperamental and it’s not that hard to kill. If the water’s too hot, you can kill the yeast. If the water is too cool, then the yeast might take a while to activate. If the yeast is too old, then it may not activate. So, follow the directions for the yeast pretty closely, because there is nothing more frustrating than getting into a bread recipe and the dough not rising.
While the yeast is activating, mix the dry ingredients of the bread dough in a stand mixer (I use a KitchenAid). This will be 4 ½ cups of Bread Flour, a teaspoon of salt, and 3 tablespoons of sugar. After you are satisfied that the yeast is sufficiently activated, to the dry ingredients add 1 ¼ cup of warm water (90 – 100 degrees Fahrenheit), 2 tablespoons of oil (Vegetable Oil is ok), and the yeast. Mix with a dough hook for about 7 – 8 minutes. Stop the mixer and check the dough. The dough should be soft, slightly sticky, and should pull completely away from the wall of the mixing bowl. The dough should be elastic and stretchy. If the dough is too wet, start the mixer again and start adding flower a tablespoon at a time, mixing for a minute or two between tablespoons, until the dough is slightly sticky but can be handled. Next time, I’ll take pictures.

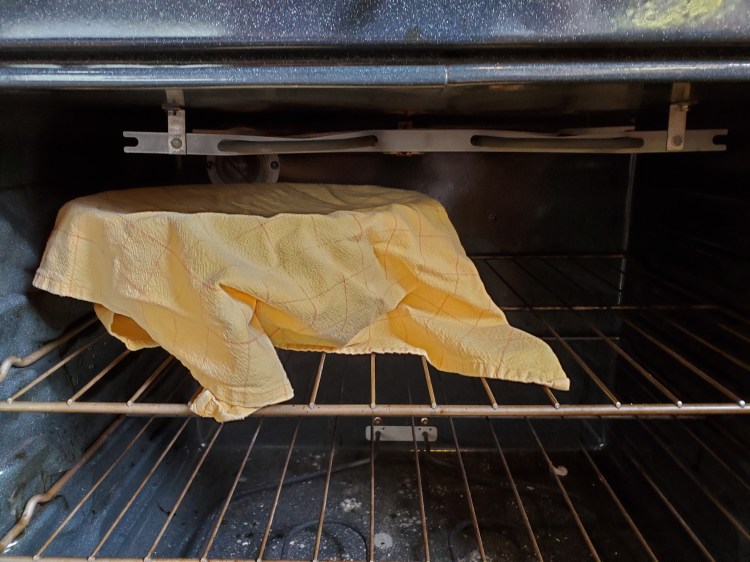
Once you are happy with the dough, prepare a large bowl for proofing the dough. Using oil, pour about a tablespoon of oil in the bottom of the bowl. Then using a folded paper towel, coat the bowl completely in oil. Remove the dough from the mixer, form into a ball, then place one side down in the bowl (swish it around the bowl to coat it with oil), then flip the dough so the oil side is up. Cover the bowl with either a dish towel or plastic wrap. Growing up, my mother and grandmother used to cover their doughs with a dish towel, so I continue the tradition.
I like to proof my dough in the oven. I do this by turning on the oven, set to 350, for about 2 minutes then turning the oven off. This warms the interior of the oven, but doesn’t get it hot enough to cook anything. If you can’t touch the racks inside the oven, then it’s too hot. You are really looking for a warm place to let your dough raise. So, once I am happy with the temperature of the oven, I put the bowl, covered with the towel into the oven. Let the dough raise for about 60 – 90 minutes. The amount of time to raise depends a lot on your yeast and conditions (environment temperature, humidity, density of dough, etc). My dough had risen above the edge of the bowl in about 70 minutes. Ideally, you want the dough to at least double in size. I wouldn’t let the dough sit for more than 90 minutes. If it hasn’t doubled in 90 minutes, then something likely happened to the yeast or the dough was too firm and had difficulty raising.
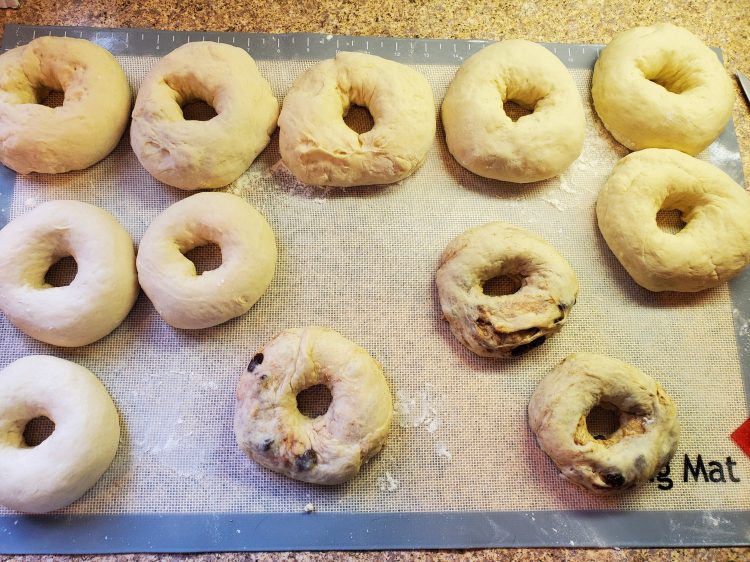
After the dough has raised punch the dough down. It should deflate pretty easily. Next, form the dough into a ball, the with both hands roll the dough out into a thick log. Cut the log into 6 equal parts. If you have a kitchen scale, each part should be around 6 ½ ounces. Take each of the parts and roll into a ball, pinching the dough together on the bottom of the ball. With a sharp knife, cut a hole in the center of each ball, and with your hands stretch the hole focusing on having an even ring of dough. I was trying to stretch the hole to around 1 ½ – 2 inches. After cutting the hole and stretching the dough, let the formed Bagels rest for about 10 – 15 minutes. The bagels will continue to raise.
While the Bagels are resting, take a large pot and fill it with 3 – 4 quarts of water. In the water, put 2/3 – 1 Cup of Honey. Bring to a boil but be careful not to let the pot boil over. Most of the recipes that I read used either honey or malt extract in the water. Apparently, this additive to the water helps the Bagel achieve the chewy texture that you associate with Bagels.
While waiting for the water to boil preheat the oven to 475 and prepare your baking pans. I use parchment paper for baking, and line the pans from end to end. Honestly, I don’t like having to scrub pans, so I try to make sure none of the pan is showing.
Once the water and honey are boiling and the Bagels have rested 15 minutes, place 2 – 3 Bagels into the boiling water. Let the Bagels sit in the boiling water for around 1 – 1 ½ minutes, then flip the Bagels. Let the Bagels sit in the boiling water for another 1 – 1 ½ minutes, then transfer the Bagels to the prepared baking pan. Don’t worry about the bagels growing larger at baking, you can put them about 1/2 inch from each other. At this point, you can season the Bagel, if desired. We coated some of the Bagels in Everything Seasoning (from a grocery store) and others in Shredded Asiago Cheese. I’ll need to think about a better way to do Cinnamon Raisin Bagels and will save that for another day.

Once you are satisfied with your seasoning, place the pan in the preheated oven (475 degrees). Bake for 15 – 20 minutes. I set the timer for 12 minutes and used that as a check point to look at the bagels. The bagels should have a nice golden brown color. Once they have the right color, remove them from the oven and transfer to a baking rack to cool.

In all, I was amazed out how these came out. The texture was soft, slightly chewy, and maybe less dense than some other bagels I have had over the years. The flavor of the plain bagel was consistent with other bagels that I have had. Now, the bagels coated in Asiago were absolutely amazing, because you had a hint of the salty sharp cheesy flavor with each bite. It was hard to refrain from eating them all in one sitting.

A couple of notes. I actually made two batches of dough and worked them in parallel. The second batch of dough was a little stickier than the first batch and was a lot softer and easier to work with after raising. In the end, both batches produced Bagels that were equally good. This means the recipe isn’t overly temperamental and has some flexibility in producing a good product. By the way, these Bagels were huge, measuring about 5 – 6 inches across.
Ingredients
Bagel Dough
4 ½ Cups of Bread Flour
3 Tablespoons of Sugar
1 Teaspoon of Salt
3 Tablespoons of Oil
1 ¼ Cup of Water (90 – 100 degrees Fahrenheit)
Activated Yeast (see below)
Activated Yeast
2 ½ Teaspoons of Dry Active Yeast
1 Teaspoon of Sugar
¼ Cup of Water (100 – 110 degrees Fahrenheit)
Boiling Water
3 – 4 Quarts of Water
2/3 – 1 Cup of Honey (or Malt Extract)
Toppings
3 – 4 Ounces of Shredded Asiago Cheese (covers 3 bagels)
1 – 3 Ounces of Everything Bagel Seasoning (spice aisle in grocery store)

Looks so good! Can’t wait to try…
LikeLike